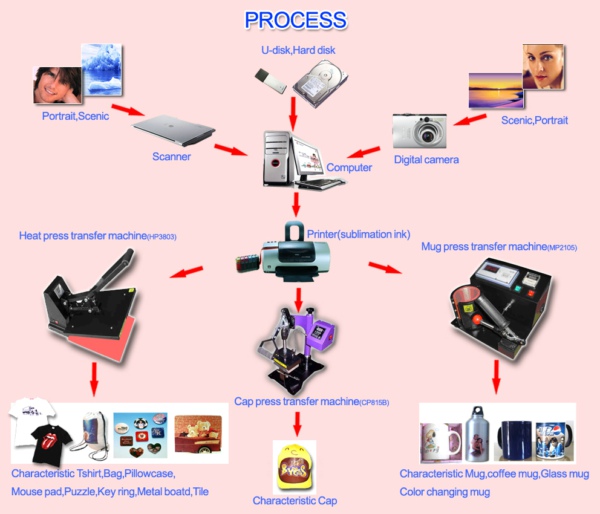
Heat Transfer Sublimation Printing Process
Detail procedure for printing Tshirt
Temperature: 185°
Time: 15 Seconds for transfer paper 60seconds for sublimation paper
Pressure: Heavy
1. Prepare your artwork and transfer with consideration to the size of the Tee shirt.
2. Spread a teflon sheet (or white paper) on the bottom of the press.
3. Slide a teflon sheet inside the shirt to protect the back of the shirt from sublimation
4. Place the shirt, face-up, on the platform, smoothing out folds and wrinkles.
5. Place the transfer, face-down, in position on the shirt.
6. Cover the shirt and transfer with a teflon sheet, assuring the transfer and shirt remain in position.
7. Remove the shirt from the press.
8. Allow to cool on a clean surface.
Additional notes:
1. Please take note of the adjustment of the handle to be suitable for pressing T shirt.
2. You may choose to “pre-press” your garment for 5 seconds to remove moisture that may be present.
Detail procedure for printing mugs
Temperature: 200°
Time: 3min to 4 min.(depending on the type of press)
Pressure: Heavy
1. Print transfer and trim to slightly smaller size than mug.
2. Attach the transfer in position to the mug with heat resistant tape.
3. Wrap the mug with a teflon sheet or plain white paper.
4. Place the mug in the press and press for 4 - 4 1/2 minutes
5. Remove the mug from the press and remove the transfer immediately. (A plastic plate-scraper will help.)
6. Place in water to cool or leave in clean, dry area
Additional notes:
1. Ceramic mugs tend to taper from top to bottom. This ‘inconsistency’ can make it difficult to apply
full wrap transfers to a mug and can compromise the imaging. Moistening the transfer or using additional
tape to fasten the transfer securely can help eliminate problems.
2. It is important to recognize what your specific mugs’ ‘safe area’ is. It is suggested that you make
a test mug to define an area that you can depend on for quality results. For example, an average mug may
take an image up to 1/2 inch of the top and bottom and no closer than 1 inch of the handles horizontally.